Mcculloch MAC 250 B User Manual
Browse online or download User Manual for Tools Mcculloch MAC 250 B. McCulloch MAC 250 B User Manual
- Page / 18
- Table of contents
- TROUBLESHOOTING
- BOOKMARKS
- 115306726 Rev. 5 1/15/11 BRW 1
- IDENTIFICATION OF SYMBOLS 3
- SAFETY RULES 3
- OPERATOR SAFETY 4
- UNIT / MAINTENANCE SAFETY 4
- ASSEMBLY 5
- OPERATION 9
- CUTTING METHODS 11
- OPERATING INSTRUCTIONS FOR 11
- USE WITH WEED BLADE 11
- MAINTENANCE 12
- SERVICE AND ADJUSTMENTS 13
- TROUBLE CAUSE REMEDY 16
- TROUBLESHOOTING TAB LE 16
- DECLARATION OF CONFORMITY 17
- TECHNICAL DAT A SHEET 18
Summary of Contents
115306726 Rev. 5 1/15/11 BRWINSTRUCTION MANUALIMPOR TANT INFORMATION: Please read these instructions carefully and makesure you understand them before
10Start throttlebuttonThrottlelock--outThrottletrigger6. Pull starter rope handle sharply until en-gine sounds as if it is trying to start, but donot
11CUTTING METHODSWARNING: Use minimum speed anddo not crowd the line when cutting aroundhard objects (rock, gravel, fence posts, etc.),which can damag
12S WHEN BLADE THRUST OCCURS --Blade Thrust can occur without warning ifthe blade snags, stalls, or binds. This ismore likely to occur in areas where
13CLEAN AIR F ILTERA dirty air filter decreases engine perform-ance and increases fuel consumption andharmful emissions. Always clean after every5 hou
14WARNING: Never use wire, rope,string, etc., which can break offand become adangerous missile.5. When installing ne w line on an existingspool, hold
15BLADE REPLACEMENTRefer to the ASSEMBLY section for blade re-placement instructions and illustrations.CARBURETOR ADJ UST MEN TWARNING: Keep others aw
16TROUBLE CAUSE REMEDYEngine will notstart.1. ON/STOP switch in STOPposition.2. Engine flooded.3. Fuel tank empty.4. Spark plug not firing.5. Fuel not
17DECLARATION OF CONFORMITYEC Declaration of Conformity (Only applies to Europe)We, Husqvarna AB, SE-561 82 Huskvarna, Sweden, tel: +46--36--146500, a
18TECHNICAL DAT A SHEETMODEL: Mac 250 BENGINECylinder displacement, cm325At maximum engine power, rpm 8000Maximum rotational frequency of the spindle
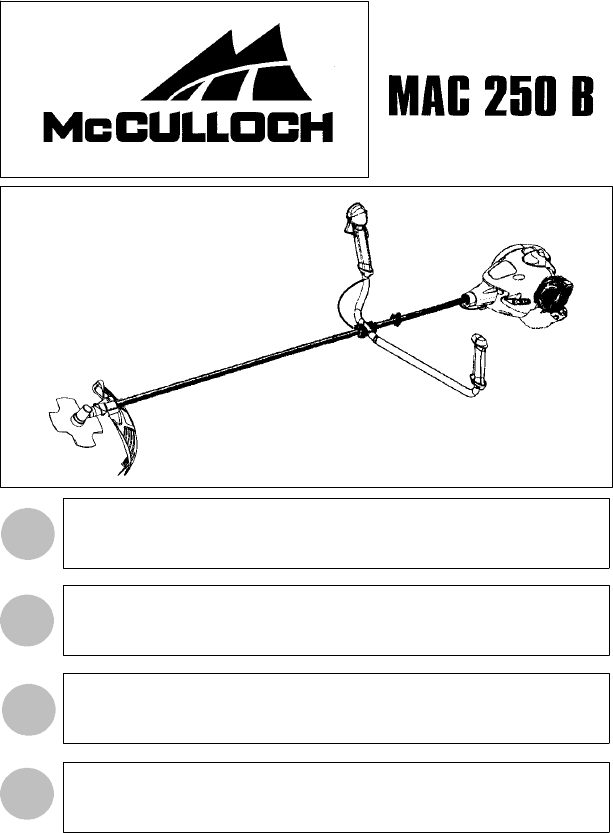
2IDENTIFICATION (WHAT IS WHAT?)15212081829710131623613171951. Fuel tank2. Handlebar3. ON/STOP switch4. Throttle cable clip5. Shoulder harness clamp6.
3IDENTIFICATION OF SYMBOLSA.B.C.D.E.F.G.H.I.J.K.A.WARNING! This brushcutter can be dangerous! Careless or improper use cancause serious or even fatal
4WARNING: Blade/trimmer line canthrow objects violently . You and others canbeblinded or injured. Wear safety glasses andleg protection.WARNING: Hazar
5S Install required shield properly before usingthe unit.S Use only specified blade or trimmer head;make sure it is properly installed and se-curely f
6It is normal for the fuel filter to rattle in theempty fuel tank.Finding fuel or oil residue on muffler is normaldue to carburetor adjustments and te
776 cmATTACHING T HE SHIELDWARNING: The shield must be prop-erly installed. The shield provides partialprotection to the operator and others from ther
8ASSEMBLY INFORMATION -- WEEDBLADEWEEDBLADENOTE: Remove the trimmer head beforeInstalling the weed blade. To remove the trim-mer head, align hole in t
9OPERATIONWARNING: Be sure to read the fuelinformation in the safety rules before you be-gin. If you do not understand the safety rules,do not attempt
© 2020, manymanuals.com. All rights reserved. | 0.599 s |
 Manymanuals.com
 Manymanuals.de
 Manymanuals.fr
 Manymanuals.it
 Manymanuals.pl
 Manymanuals.cz
 Manymanuals.es
 Manymanuals-pt.com
Comments to this Manuals